<?xml version="1.0" encoding="utf-8"?><feed xmlns="http://www.w3.org/2005/Atom" ><generator uri="https://jekyllrb.com/" version="4.4.1">Jekyll</generator><link href="https://perseuslynx.dev/feed/blog.xml" rel="self" type="application/atom+xml" /><link href="https://perseuslynx.dev/" rel="alternate" type="text/html" /><updated>2026-05-14T18:02:26+00:00</updated><id>https://perseuslynx.dev/feed/blog.xml</id><title type="html">Perseus’ Website | Blog</title><subtitle>A simple personal website</subtitle><author><name>Perseus</name></author><entry><title type="html">Cracking NFC IDs with a Pi and $5</title><link href="https://perseuslynx.dev/blog/mfoc-guide" rel="alternate" type="text/html" title="Cracking NFC IDs with a Pi and $5" /><published>2026-05-14T00:00:00+00:00</published><updated>2026-05-14T00:00:00+00:00</updated><id>https://perseuslynx.dev/blog/mfoc-guide</id><content type="html" xml:base="https://perseuslynx.dev/blog/mfoc-guide"><![CDATA[<p>MIFARE Classic is a relatively ancient and insecure type of RFID/NFC cards that, due to its extremely low cost, has become the de facto option for many low-security applications. It relies on the Crypto1 cipher, a classic example of the inherent weakness of security through obscurity. Back in 2008-2009, researchers demonstrated multiple reproducible attacks by exploiting a weakness in the authentication process that allows the recovery of the keys and a full dump of the device. With this guide you will learn how to use a tool based on one of the exploits using nothing more than a Raspberry Pi and a cheap PN532 NFC module.</p>

<h2 id="requirements">Requirements</h2>
<ol>
  <li>MIFARE Classic card that YOU OWN</li>
  <li>PN532 NFC module (~ 5 USD)</li>
  <li>Raspberry Pi Zero 2 W (or any Pi preferably with WiFi)</li>
  <li>4 female-female jumper wires</li>
  <li>1-2 hours of your time
Optional:</li>
  <li>Simple soldering station (if the PN532 doesn’t have headers)</li>
  <li>Phone with NFC Reader</li>
</ol>

<h2 id="steps">Steps</h2>
<ol>
  <li>Ensure that the card you want to crack is a MIFARE Classic by downloading <a href="https://f-droid.org/de/packages/com.github.muellerma.nfcreader/">NFC-Reader (fdroid.org)</a> on a phone that has an NFC module.</li>
  <li>On <code class="language-plaintext highlighter-rouge">rpi-imager</code> load the Legacy 64-bit Lite (Debian Bookworm) version of the OS (it has worked the best for me). When configuring it, set up wifi and enable SSH. Then flash the OS and, once completed, put the SD card in the Pi.</li>
  <li>Connect the Pi to a wall plug through the “PWR” labeled micro-USB port (the one nearest to the edge). Wait a few minutes for it to boot, and try to connect to it over SSH by specifying the hostname and user that you set up in the imager. If you encounter DNS issues where the hostname is not found, try connecting to it directly via the IP address, which you can find with <code class="language-plaintext highlighter-rouge">nmap</code> or through the router’s admin page.</li>
  <li>I used I²C just because it requires fewer wires so the next steps assume an I²C connection, although SPI work equally fine. Depending on which module you’re using there might be a mechanism to toggle between I²C and SPI. Ensure that I²C is selected, in my case it was a DIP switch. This is also a good time to solder the headers into the PN532 module in case they are not preinstalled.</li>
  <li>Connect the PN532 RFID module to the Pi by matching the appropriate pins. For more information, see <a href="https://pinout.xyz/">Raspberry Pi Pinouts (pinout.xyz)</a>. You want to connect 5V to VCC, and match the rest with the pins of the same name.</li>
</ol>

<p><img src="/src/assets/pizero-pn532.webp" alt="Setup of the Pi Zero 2 W and PN532" /></p>

<ol>
  <li>Install the necessary system-wide packages:
    <div class="language-shell highlighter-rouge"><div class="highlight"><pre class="highlight"><code><span class="nb">sudo </span>apt update
<span class="nb">sudo </span>apt-get <span class="nb">install</span> <span class="nt">-y</span> i2c-tools libnfc-bin mfoc
</code></pre></div>    </div>
  </li>
  <li>Enable I²C in the Pi with <code class="language-plaintext highlighter-rouge">sudo raspi-config</code> and navigate through the menus to select:  <code class="language-plaintext highlighter-rouge">Interfacing options -&gt; I2C -&gt; Yes -&gt; Finish</code>.</li>
  <li>Check that I²C is working, you should see a grid of dashes and a single number (usually <code class="language-plaintext highlighter-rouge">24</code>) within them, which corresponds to the I²C address of the PN532 device.
    <div class="language-shell highlighter-rouge"><div class="highlight"><pre class="highlight"><code>i2cdetect <span class="nt">-y</span> 1
</code></pre></div>    </div>
  </li>
  <li>Create the configuration file for your PN532 device at <code class="language-plaintext highlighter-rouge">/etc/nfc/libnfc.conf</code> and set it to the following contents:
    <div class="language-c highlighter-rouge"><div class="highlight"><pre class="highlight"><code><span class="n">device</span><span class="p">.</span><span class="n">name</span> <span class="o">=</span> <span class="s">"PN532_I2C"</span>
<span class="n">device</span><span class="p">.</span><span class="n">connstring</span> <span class="o">=</span> <span class="s">"pn532_i2c:/dev/i2c-1"</span>
</code></pre></div>    </div>
  </li>
  <li>Finally, run <code class="language-plaintext highlighter-rouge">mfoc</code>:
    <div class="language-shell highlighter-rouge"><div class="highlight"><pre class="highlight"><code> mfoc <span class="nt">-O</span> card.mfd
</code></pre></div>    </div>

    <p>When run,  you’ll see <code class="language-plaintext highlighter-rouge">mfoc</code> doing its magic and it will dump the contents of the RFID device and save it where you specified. It will look something like the following, but it will probably take longer to find the keys:</p>
    <div class="language-plaintext highlighter-rouge"><div class="highlight"><pre class="highlight"><code> non@pi:~/rfid $ mfoc -O vvv.mfd
 Found Mifare Classic 1k tag
 ISO/IEC 14443A (106 kbps) target:
     ATQA (SENS_RES): 00  04  
 * UID size: single
 * bit frame anticollision supported
     UID (NFCID1): 01  5c  3d  5d  
     SAK (SEL_RES): 08  
 * Not compliant with ISO/IEC 14443-4
 * Not compliant with ISO/IEC 18092

 Fingerprinting based on MIFARE type Identification Procedure:
 * MIFARE Classic 1K
 * MIFARE Plus (4 Byte UID or 4 Byte RID) 2K, Security level 1
 * SmartMX with MIFARE 1K emulation
 Other possible matches based on ATQA &amp; SAK values:

 Try to authenticate to all sectors with default keys...
 Symbols: '.' no key found, '/' A key found, '\' B key found, 'x' both keys found
 [Key: ffffffffffff] -&gt; [xxxxxxxxxxxxxxx.]
 [Key: a0a1a2a3a4a5] -&gt; [xxxxxxxxxxxxxxx.]
 [Key: d3f7d3f7d3f7] -&gt; [xxxxxxxxxxxxxxx.]
 [Key: 000000000000] -&gt; [xxxxxxxxxxxxxxx.]
 [Key: b0b1b2b3b4b5] -&gt; [xxxxxxxxxxxxxxx.]
 [Key: 4d3a99c351dd] -&gt; [xxxxxxxxxxxxxxx.]
 [Key: 1a982c7e459a] -&gt; [xxxxxxxxxxxxxxx.]
 [Key: aabbccddeeff] -&gt; [xxxxxxxxxxxxxxx.]
 [Key: 714c5c886e97] -&gt; [xxxxxxxxxxxxxxx.]
 [Key: 587ee5f9350f] -&gt; [xxxxxxxxxxxxxxx.]
 [Key: a0478cc39091] -&gt; [xxxxxxxxxxxxxxx.]
 [Key: 533cb6c723f6] -&gt; [xxxxxxxxxxxxxxx.]
 [Key: 8fd0a4f256e9] -&gt; [xxxxxxxxxxxxxxx.]

 Sector 00 - Found   Key A: ffffffffffff Found   Key B: ffffffffffff
 Sector 01 - Found   Key A: ffffffffffff Found   Key B: ffffffffffff
 [...]
 Sector 15 - Unknown Key A               Unknown Key B


 Using sector 00 as an exploit sector
 Sector: 15, type A, probe 0, distance 64 .....
 Found Key: A [6381537b658c]
 Data read with Key A revealed Key B: [a1365c65860f] - checking Auth: OK
 Auth with all sectors succeeded, dumping keys to a file!
 Block 63, type A, key 6381537b658c :00  00  00  00  00  00  ff  07  80  69  a1  36  5c  65  86  0f  
 Block 62, type A, key 6381537b658c :76  69  63  69  00  00  00  00  00  00  00  00  00  00  00  00  
 Block 61, type A, key 6381537b658c :76  69  64  69  00  00  00  00  00  00  00  00  00  00  00  00  
 Block 60, type A, key 6381537b658c :76  65  6e  69  00  00  00  00  00  00  00  00  00  00  00  00  
</code></pre></div>    </div>
  </li>
  <li>Once it has dumped the contents into the file, you can try reading them with <code class="language-plaintext highlighter-rouge">hexdump -C card.mfd</code> or <code class="language-plaintext highlighter-rouge">strings card.mfd</code> which might reveal some information if it has not been obfuscated.
    <div class="language-plaintext highlighter-rouge"><div class="highlight"><pre class="highlight"><code>*
000003b0  ff ff ff ff ff ff ff 07  80 69 ff ff ff ff ff ff  |.........i......|
000003c0  76 65 6e 69 00 00 00 00  00 00 00 00 00 00 00 00  |veni............|
000003d0  76 69 64 69 00 00 00 00  00 00 00 00 00 00 00 00  |vidi............|
000003e0  76 69 63 69 00 00 00 00  00 00 00 00 00 00 00 00  |vici............|
000003f0  63 81 53 7b 65 8c ff 07  80 69 a1 36 5c 65 86 0f  |c.S{e....i.6\e..|
</code></pre></div>    </div>
  </li>
</ol>

<h2 id="further-reading">Further reading</h2>

<p><a href="https://f-droid.org/es/packages/de.syss.MifareClassicTool/">MIFARE Classic Tool (fdroid.org)</a> is a really intuitive and powerful app that allows you to write arbitrary data, clone, read, compare cards, and more. Depending on your card, if it uses a standard key, it will automatically try a list of the most common keys relatively quickly.</p>

<p>If none of the sectors have any standard keys <code class="language-plaintext highlighter-rouge">mfoc</code> will not work and you will need to use <code class="language-plaintext highlighter-rouge">mfcuk</code> to extract at least one of the keys. Cards may also be hardened in other ways, but cracking those is outside of the scope of this guide.</p>

<p>If you’re interested, in the next blog post I will break down the “magic” of the exploit behind <code class="language-plaintext highlighter-rouge">mfoc</code>. Stay tuned!</p>]]></content><author><name>Perseus</name></author><category term="cybersecurity" /><summary type="html"><![CDATA[A simple guide on running the nested attack through mfoc with a Raspberry Pi and a PN532 NFC device]]></summary></entry><entry><title type="html">Restoring WhatsApp with root</title><link href="https://perseuslynx.dev/blog/whatsapp-bkp" rel="alternate" type="text/html" title="Restoring WhatsApp with root" /><published>2025-12-17T00:00:00+00:00</published><updated>2025-12-17T00:00:00+00:00</updated><id>https://perseuslynx.dev/blog/whatsapp-bkp</id><content type="html" xml:base="https://perseuslynx.dev/blog/whatsapp-bkp"><![CDATA[<h1 id="the-rant">The Rant</h1>

<blockquote>
  <p>IMPORTANT: This method is not supported by WhatsApp, always ensure that you have your WhatsApp data backed up with official methods. Also, this method requires having root (admin privileges) in the old and new device.</p>
</blockquote>

<blockquote>
  <p>You can skip to the <a href="#tutorial">Tutorial Section</a> directly.</p>
</blockquote>

<p>A couple of months ago I installed PixelOS on my phone since I was getting tired of being stuck in Android 11 and it was the (unofficial) version that offered the highest Android version for my phone. It worked fine except for <a href="xiaomi-led">some minor issues</a>. Recently however, I became frustrated after encountering seemingly insurmountable obstacles regarding play integrity verification in some apps that I wanted to install. What I realized then is that if I couldn’t benefit from having <a href="https://www.scss.tcd.ie/Doug.Leith/pubs/cookies_identifiers_and_other_data.pdf">spyware</a> baked into the OS, why did I allow it?</p>

<p>I wouldn’t consider myself particularly wary of privacy, but it feels good to break free from the web of probably the most pervasive company in the world. I decided therefore that I would install a ROM that wouldn’t include google in it, but also I wouldn’t install GApps on it. I’m quite lucky that my current situation allows me to not require using a google product for my work, so it may not be an option for everyone. The option I chose was LineageOS mainly because I’ve had <a href="lineageos-review">positive experiences</a> with it.</p>

<p>I know you’re probably thinking of me as hypocritical right now by refusing to let myself slide into the convenience of mega corporations whilst making a tutorial to use a product from another of them. But as I’ve said, these companies have managed to become so ingrained into our societies, they have become a necessary evil if you want to communicate with people around you that don’t have the interest or the time to escape convenience.</p>

<p>This tutorial is particularly important for me, because had I known about it just a couple of months ago I wouldn’t have lost more than 5 years of memories that I had entrusted to Meta. I believed that the official methods would work, yet to my dismay they didn’t, and upon installing WhatsApp on a new ROM and attempting to recover the backup from Google Drive it failed. This time around I didn’t want to end up with the same fate even though the stakes were a lot lower now. (And, also I couldn’t because without GApps you cannot recover data from a Google Drive account :p )</p>

<p><em>I had heard mythical tales that told legends about  this hidden directory, only accessible to those users of the highest level (which ironically are not users) that contained scrolls where scribed in them were the logs from all of the conversations ever spoken (by you and to you). And that in theory, if you had access to those scrolls (files), you could restore the order of the universe (just that app). And so, I decided to set sail on this dangerous journey with just the company of my trusty backup drive. (I honestly don’t know what I have written).</em></p>

<p>So yeah, if you have root you have access to the application data of WhatsApp and therefore if in the new system you also have root, you are able to just paste the old data in, and recover all of your old chats, since in there are reside all messages, encrypted, and the key to decrypt them.</p>

<p>This is not so much about the tutorial steps (which still may be useful to some of you) but rather about not trusting your own sensitive data, and your memories exclusively to some third parties. You should have some degree of ownership of your data, or else you’re not in control of yourself, as by extension, memories are are part of you. This does not only apply to messages, but to family photos, e-mails, etc. (I’ll make a post in a couple of days about that). I’ve always found that phones are one of the devices that you own the least, since you’re heavily constrained, so take this also as yet another reason to root your phone (if you can afford potentially losing Play Integrity).</p>

<p>Anyways, that’s my rant, below is how to regain control of your memories:</p>

<h1 id="tutorial">Tutorial</h1>

<ol>
  <li>Before formatting your phone or whatever, copy <code class="language-plaintext highlighter-rouge">/data/data/com.whatsapp</code> to an external folder. SD card, HDD, etc.</li>
  <li>Once the new OS is installed, install WhatsApp and open it, but don’t click anything. Close it, and force stop it from settings.</li>
  <li>From the terminal, either <code class="language-plaintext highlighter-rouge">adb</code> or Termux, run the following command. You’ll get some numbers, but two of them will be the same 5 digit numbers that start with 10. Write them down on a piece of paper.
    <div class="language-sh highlighter-rouge"><div class="highlight"><pre class="highlight"><code><span class="nb">ls</span> <span class="nt">-ldn</span> /data/data/com.whatsapp
</code></pre></div>    </div>
  </li>
  <li>Paste your backup directory of <code class="language-plaintext highlighter-rouge">com.whatsapp</code> directly into <code class="language-plaintext highlighter-rouge">/data/data</code>.</li>
  <li>Run the following commands, where <code class="language-plaintext highlighter-rouge">UID</code>  is the number that you wrote down.
    <div class="language-sh highlighter-rouge"><div class="highlight"><pre class="highlight"><code><span class="nb">cd</span> /data/data/
<span class="nb">chown</span> <span class="nt">-R</span> UID:UID com.whatsapp
<span class="nb">chmod</span> <span class="nt">-R</span> 770 com.whatsapp
</code></pre></div>    </div>
  </li>
  <li>Reboot the phone</li>
  <li>Open WhatsApp again. You should see your messages right there.</li>
  <li>You’ll probably be logged out soon after. Perform the steps, grant the appropriate permissions, and when asked to restore from backup, decline. Once done, you should end up with your WhatsApp app good as new.</li>
</ol>]]></content><author><name>Perseus</name></author><category term="android" /><summary type="html"><![CDATA[A short tutorial on restoring the WhatsApp app with the original files]]></summary></entry><entry><title type="html">Disabling Xiaomi Mi 8 LED</title><link href="https://perseuslynx.dev/blog/xiaomi-led" rel="alternate" type="text/html" title="Disabling Xiaomi Mi 8 LED" /><published>2025-10-18T00:00:00+00:00</published><updated>2025-10-18T00:00:00+00:00</updated><id>https://perseuslynx.dev/blog/xiaomi-led</id><content type="html" xml:base="https://perseuslynx.dev/blog/xiaomi-led"><![CDATA[<p>A walkthrough of desactivating the notification / battery LED for the Xiaomi Mi 8 Lite.
<!--more--></p>

<blockquote>
  <p>If you came here just for the solution go to the <a href="#solutions">Solution</a> section.</p>
</blockquote>

<h2 id="backstory">Backstory</h2>

<p>During this summer I installed a custom ROM to my phone and rooted it. This was partially for tinkering and partially because I wanted to see the “new” Android 15 UI. The phone that I have, is the first phone that I ever bought: a Xiaomi Mi 8 Lite. When I bought it, 6 years ago, I didn’t think very long term, and I just wanted something cheap so I could convince my parents to buy me a phone. Also, naive me, I didn’t care nor know the full extent of the bloat of Mi devices. The rooting process could’ve been a blog entry of it’s own, but I’ll narrate that odyssey another day. I went for an <a href="https://xdaforums.com/t/rom-unofficial-pixelos-android-15-4-19-mi-8-lite-platina.4711493/">unofficial PixelOS ROM</a> that came with Android 15. I would’ve preferred LineageOS, but there wasn’t any builds for Android 15. Shortly after installation I patched the ROM with Magisk and I gained root access. Root meant I had power, and I was going to take any opportunity to use it.</p>

<h2 id="the-problem">The problem</h2>

<p>Over time, when I used my phone I noticed that the LED light would start blinking (or “breathing”) when the battery was low. At first it wasn’t annoying but over time, it became almost infuriating. Specially since I didn’t know what was happening as sometimes I didn’t have low battery and it kept flashing. The notification light also works to indicate if the phone is charging and other features, but that didn’t disturb me at all.</p>

<h2 id="trying-to-find-a-solution-blindly-and-almost-stumbling-into-it">Trying to find a solution blindly (and almost stumbling into it)</h2>

<p>My very first idea was to use my newly gained root powers to fix this, so I did some research. It turns out that Android keeps the configuration of the leds at <code class="language-plaintext highlighter-rouge">/sys/class/leds</code>. After a lot of manual trial and error of setting values in the files using Termux I gave up, as I couldn’t find which LED was responsible for the behaviour. Now, below are the directories inside <code class="language-plaintext highlighter-rouge">/sys/class/leds</code>, which of these ones do you think that is the one that controls the front white LED?</p>

<div class="language-plaintext highlighter-rouge"><div class="highlight"><pre class="highlight"><code>blue/           led:switch_0/  mmc1::/
green/          led:switch_1/  red/
lcd-backlight/  led:torch_0/   torch-light0/
led:flash_0/    led:torch_1/   torch-light0_1/
led:flash_1/    led:torch_2/   torch-light1/
led:flash_2/    mmc0::/        wled/
</code></pre></div></div>

<p>You’d probably guess wled, but when you would do <code class="language-plaintext highlighter-rouge">echo 0 &gt; wled/brightness</code>, you would just be staring at an idiot who turned his screen black.</p>

<p>In each of these folders there are a myriad of other subfolders, symlinks and distractions like <code class="language-plaintext highlighter-rouge">triggers</code> that are identical for all of them and that provide no meaningful differentiation between them. So, it wasn’t unsurprising that without following any methological approach, I couldn’t find anything.</p>

<h2 id="converging-diversions">Converging Diversions</h2>

<p>This wasn’t something that I had dedicated much time, but it was still something unresolved and I wanted to do something about it. It also didn’t help that there was 0 information about it online so there wasn’t much that I could do. In fact, the few information that I found were just red herrings. Even though unrelated, what I learned when trying to advance from there became useful for finding the answer.</p>

<p>The sources online said that <code class="language-plaintext highlighter-rouge">notification_policy.xml</code> contained all of the notification triggers for all of the apps so I should be able to find it here. This was were I found out that actually what was called <code class="language-plaintext highlighter-rouge">.xml</code> wasn’t really XML but actually ABX a compressed and more efficient version of XML that Android introduced as a replacement for the former in Android 12.</p>

<p>I was for some reason convinced that my phone couldn’t decrypt that on it’s own and that I needed to do it on my laptop, so after trying out some <a href="https://github.com/rhythmcache/android-xml-converter">very poorly documented repos</a> I realized that I had to download an NDK (Native Development Kit). This led me to download Android studio after not being able to download the NDKs from my distro’s repositories.</p>

<p>As I was trying to configure my phone for wireless debugging (for some reason) I stumbled upon an interesting section of the “System” android settings: “Device Specific Settings” with the icon of Mi next to it. Upong cliking it, I saw:</p>

<h2 id="notification-led">Notification LED</h2>

<p>And below it an option that read: “LED Brighness” above a slider. It was perfect! I could just set it to 0 and it would work!</p>

<p>Nope. The minimum value was 1% and it seemed like the LED didn’t care about it when it was blinking/breathing. So, what to do? Well, of course, finding the package that contained this configuration, decompiling it and trying to read through it’s code any call referencing that slider…</p>

<p>Funnily enough I already had everything that I needed, Android Studio. Googling led me to find out that the package was called <code class="language-plaintext highlighter-rouge">org.Lineageos.settings.device</code>. What does LineageOS have to do about this? I don’t know, I was too excited to finally figure out what triggered it. After pulling the APK and opening it in Android studio I found the file responsible for it scouring through the directory tree.</p>

<p><img src="/src/assets/android-studio.webp" alt="Android Studio Screenshot" /></p>

<p>As can be seen from the line:</p>

<div class="language-java highlighter-rouge"><div class="highlight"><pre class="highlight"><code><span class="kd">const</span> <span class="n">string</span> <span class="n">p0</span><span class="o">,</span> <span class="s">"sys/class/leds/red/brightness"</span>
</code></pre></div></div>

<p>It turned out that the notification dot was able to be modified all along from the <code class="language-plaintext highlighter-rouge">/sys/class/leds</code>, the only thing is that for some reason, the only LED that I didn’t touch was the <code class="language-plaintext highlighter-rouge">red</code> one. I checked the green one, the white one, even the Torch!! Who would’ve guessed that the while led on top of my screen was controlled by the <code class="language-plaintext highlighter-rouge">red</code> led…</p>

<h2 id="solutions">Solutions</h2>

<p>It turns out that this light only activates if the battery is below the Schedule (based on percentage) set by the Battery Saving settings. You can turn it all the way up to 75% and no matter if you have battery saver set or not, the light will breathe it’s photons at your face. Disabling the schedule will just trigger it at 20%, so what I’ve found to be the best option is to enable the schedule from the settings and set it to 0% with the following command:</p>

<div class="language-plaintext highlighter-rouge"><div class="highlight"><pre class="highlight"><code>settings put global low_power_trigger_level 0
</code></pre></div></div>

<p>If you alternatively just want to reduce the brightness of the LED when it’s in it’s solid state go to: (Android) Settings &gt; System &gt; Device Specific Settings &gt; Notification LED and change the percentage. Note that this will just change the brightness of the solid light and not the breath behaviour.</p>

<p>If you’re interested about turning off the LED entirely you have either temporal or permanent solutions, both of which require you to be rooted.</p>

<p>To disable the LED temporarily you just need to set <code class="language-plaintext highlighter-rouge">/sys/class/leds/red/breath</code> to 0. You can do so with the following command:</p>

<div class="language-plaintext highlighter-rouge"><div class="highlight"><pre class="highlight"><code>echo 0 &gt; /sys/class/leds/red/breath
</code></pre></div></div>

<p>If you want to reduce the solid LED brightness to 0 or to whatever value you want change the value of <code class="language-plaintext highlighter-rouge">/sys/class/leds/red/brightness</code> and <code class="language-plaintext highlighter-rouge">/maxbrightness</code> to you custom value. For example, zero as seen the following examples:</p>

<div class="language-plaintext highlighter-rouge"><div class="highlight"><pre class="highlight"><code>echo 0 &gt; /sys/class/leds/red/brightness
echo 0 &gt; /sys/class/leds/red/max_brightness
</code></pre></div></div>

<p>Note that this will not affect the breathing of the LED permanently, but it will turn it off until it gets activated again.</p>

<p>I’m still searching for ways to disable it permanently, and once I do, I’ll update this post.</p>

<p>Anyways, that’s all of it for now. I hope that you found it useful in some way.</p>]]></content><author><name>Perseus</name></author><category term="android" /><summary type="html"><![CDATA[Decompiling system APKs to disable a blinking notification/battery LED]]></summary></entry><entry><title type="html">Initialize existential questions at Null</title><link href="https://perseuslynx.dev/blog/questions-null" rel="alternate" type="text/html" title="Initialize existential questions at Null" /><published>2025-10-11T00:00:00+00:00</published><updated>2025-10-11T00:00:00+00:00</updated><id>https://perseuslynx.dev/blog/questions-null</id><content type="html" xml:base="https://perseuslynx.dev/blog/questions-null"><![CDATA[<p>When people don’t have the answers to questions that they need urgent answers to, they tend to default to their environment’s consensus. It’s a part of our human nature. We don’t like uncertainty, and we prefer holding into any answer rather than accepting our ignorance. The greater the question the more clear this pattern becomes. And more sacrifices are made to come up with a satisfactory answer at all costs. Over the next few paragraphs we will examine the shortcomings of the most  common categories of answers, and in the end I’ll propose what I find to be the most honest one.</p>

<!--more-->

<p>Let’s look at an example, one of the most recurring questions in history: “Does God exist?” All of the major cultures try providing and are convinced of their answers for it. But why should we assume that it exists? And which answer should we favor? Is this a question that we can even try to find an answer to through reason? I’d argue that most likely not. If we’re assuming something like God exists, why should we arrive at that decision logically? Isn’t the whole point of the religions around faith? If there was demonstrable evidence, what would be the purpose of faith?</p>

<p>Maybe the question of the existence of God is a bit too multi-faceted to examine properly, so let’s look at another of the big ones: “What’s the meaning of life?” This is a more approachable query, although yet again, it’s one of the questions that has tormented the minds of the greatest thinkers of history without any coming up with a conclusive answer. If we examine both questions, we will see that they both try looking into something that even though is related to our lives, isn’t material, quantifiable, observable or interactive. It’s a thought, an abstract idea, or something existing in a different plane than that of our minds and experiences, it’s metaphysical. Trying to figure out an answer is not bad, in fact there’s lessons to be learnt from asking, the problem, un-intuitively, lies in answering these questions. Regarding concepts so alien and so grandiose, how would any human be able to figure out an answer? What reason, no matter how brilliant, can bridge the two worlds?</p>

<p>The second problem arises for giving predilection for any answer. After all, all of them lack any completely robust reasoning behind them, as they require logical leaps or assumptions to bridge the two separate dimensions. The preference is usually given to the answer provided by your community, but just because you belong to that group doesn’t make their arguments any better than the others.</p>

<p>One tempting answer then is to assume it’s inexistence. If we can’t agree if there is a God, or which one it is; or we cannot figure out the meaning of life, it must be because they cannot exist. To some degree, this answer is practical. After all, if there is no way to corroborate the existence of something, why would we care if we’re wrong in it’s assumption of it existing? It has no impact on us, and in fact, we’ll never know, we could even go so far as to dismiss the question as pointless. If we’re wrong, we’ll never know nor have any way of knowing. The only problem with this answer is that it became the sole thing it swore to destroy, a dogma that relies on a logical leap. Asserting with confidence the inexistence of something just because you can’t decipher it, is like saying that there is no life in the universe, just because you have no way of knowing. For most people that agree that there are unanswerable questions, not caring will probably be their most satisfactory answer, which is, for all intents and purposes refuting the existence of whatever may be questioned.</p>

<p>The third option and what I’m proposing here, is when faced with these questions to which we have no answer, and probably won’t ever, to initialize them at <code class="language-plaintext highlighter-rouge">Null</code>. In programming languages when you initialize a variable without providing it any value it adopts the state of <code class="language-plaintext highlighter-rouge">Null</code>.  There is memory reserved for it but no value has been assigned. At its core, it’s coming to terms with our ignorance and not any answer, yet using that as our response. It’s leaving the question unanswered as we found it, and allowing for a stance that isn’t either accepting pre-existing dogmas nor denials. It is actively acknowledging that the question is unanswerable. Not giving it any answer without dismissing it, allows for further exploration of the question. It’s not an easy conclusion to reach as it doesn’t provide any value beyond the reflection itself. But that is where its value resides, in its logical integrity for rebelling against our very own instincts.</p>

<p>So, for deep questions which we may not know the meaning of now or in the future, I propose that we accept with humility the limitations of our nature, and we understand that jumping into logical fallacies just to fill a void is insincere. No matter whether you are the ones that quickly jump to conclusions, or the ones that refute them all altogether, you should realize that there are missing steps in such reasoning. If you decide to persist in your beliefs for either peace of mind, or for following a defined guidance, at least be aware of the logical leap that brought you there. Hence, to leave the questions at <code class="language-plaintext highlighter-rouge">Null</code> is ultimately to be sincere with ourselves.</p>]]></content><author><name>Perseus</name></author><category term="philosophy" /><summary type="html"><![CDATA[an argument for intellectual honesty with one self]]></summary></entry><entry><title type="html">Minifying this website</title><link href="https://perseuslynx.dev/blog/minifying-website" rel="alternate" type="text/html" title="Minifying this website" /><published>2025-10-08T00:00:00+00:00</published><updated>2025-10-08T00:00:00+00:00</updated><id>https://perseuslynx.dev/blog/minifying-website</id><content type="html" xml:base="https://perseuslynx.dev/blog/minifying-website"><![CDATA[<p>This is going to be a very small devlog, but it might include some useful info to some that are looking to save their visitor’s bandwith or joining one of the presigious SMALL_BYTE_SIZE clubs.</p>

<p>The other day I was looking up some people’s blogs (it’s quite fun), and I came around the <a href="https://250kb.club">250KB Club</a> website. Curious by how they measured it, I found out that the <a href="https://512kb.club">512KB Club</a> used <a href="https://radar.cloudflare.com/scan">Cloudflare’s URL Scan</a>. Upon <a href="https://radar.cloudflare.com/scan/310b2d7c-3e0d-454f-b322-f19f30ff5fa4/summary">examining my website</a> I found out that it was quite horrible. Even though I tried some optimization techniques such as using .webp images, the size of the homepage alone was almost 1MB; half of which came from the Monaspace Font that I had in .ttf format. Below is a breakdown of the top 5 offenders:</p>

<table>
  <thead>
    <tr>
      <th>Resource</th>
      <th>Size (in KB)</th>
    </tr>
  </thead>
  <tbody>
    <tr>
      <td>Monaspace.ttf</td>
      <td>602.38</td>
    </tr>
    <tr>
      <td>banner.webp</td>
      <td>118.76</td>
    </tr>
    <tr>
      <td>IBM_VGA.ttf</td>
      <td>25.66</td>
    </tr>
    <tr>
      <td>pfp.webp</td>
      <td>11.55</td>
    </tr>
    <tr>
      <td>index.html</td>
      <td>6.85</td>
    </tr>
  </tbody>
</table>

<h2 id="optimizing-the-fonts">Optimizing the fonts</h2>

<p>As you can see, not very optimal. However, this allowed me to see the biggest issue: The fonts. After some research I found that fonts stored in the WOFF2 format are, from my experience ~3x more compact than TTF. That was a nice increase, however, I learned it after discovering that you could trim down the character selection for the fonts. That is, removing all of the unicode characters that you won’t use. For my usecases I’m perfectly fine just using the <a href="https://en.wikipedia.org/wiki/List_of_Unicode_characters#Basic_Latin">basic latin</a>. That reduced the size by a factor of 4 the file size. In the end, my 600 KB monaspace font was converted into a much more manageable 48K, which tracks with the 12x increase from both methods.</p>

<h2 id="compressing-the-images">Compressing the images</h2>

<p>Up until now, I thought I was doing pretty ok with my images. I was using .webp fairly standardly (mainly because it was easier to script with Jekyll) and when I converted the images in GIMP I selected the 0.75 quality slider. Turns out it wasn’t so great.</p>

<p>After not so much luck with using websites for it, I decided that I would run a shell script for it. And that’s how I came up with <a href="https://gist.github.com/Perseus333/8a161ffa160b0d2f6c2fd3c9756b1568">compress.fish</a>, which leverages Magisk to compress the images exactly how I want to. Now, after adding my new images to the <code class="language-plaintext highlighter-rouge">src/assets/uncompressed/</code> I ran <code class="language-plaintext highlighter-rouge">compress.fish</code> and the lighter images would be replaced at <code class="language-plaintext highlighter-rouge">src/assets/</code>. There was just one problem, the images were very blurry, of course. In some of my images, readability of graphs or labels is important so I couldn’t leave it like this.</p>

<h2 id="creating-my-first-jekyll-plugin">Creating my first jekyll plugin</h2>

<p>If you’re myself, then you’ve probably read my guide on how to make <a href="/blog/jekyll-first-plugin">your first Jekyll plugin</a> that I made almost a year ago. And no, I didn’t take 1 year to write this plugin, I just gave up on the previous one. So, even though I knew about the basics about Jekyll plugins, and their structure I still didn’t know a lot about Ruby. As I developed this, one year after the guide, I realized how what I once thought was a pretty decent guide, was at times confusing even to myself.</p>

<p>Anyways, my goal was to make a jekyll plugin that would wrap the images (&lt;img&gt;) all throughout my website with a link tag (&lt;a&gt;) that would redirect to the original uncompressed image. I did some reasearch but I couldn’t find any plugin that did this the way that I wanted to, so if you’re interested in having this in your website, feel free to use it and/or modify it to suit your needs, it’s under the MIT licence.</p>

<p>Since I was for all intents and purposes new to Ruby it took me wayy longer than it should to write a sub 100 line Ruby program to do that… But it was fun. I added an option so that you could specify the location of the uncompressed images and that was it!</p>

<p>In the future I do plan to add a feature to compress the images the same way that the <code class="language-plaintext highlighter-rouge">compress.fish</code> script does, but that’s stuff for another day.</p>

<h2 id="the-final-results">The final results</h2>

<p>So, was spending ~5 hours trying to figure out how to reduce images worth it? Well YES! By a lot, but actually not so much… Below is the table with the comparison of the top 5 resources and their previous values:</p>

<table>
  <thead>
    <tr>
      <th>Resource</th>
      <th>Original Size (in KB)</th>
      <th>New Size (in KB)</th>
    </tr>
  </thead>
  <tbody>
    <tr>
      <td>Monaspace.ttf</td>
      <td>602.38</td>
      <td>44.21</td>
    </tr>
    <tr>
      <td>banner.webp</td>
      <td>118.76</td>
      <td>6.52</td>
    </tr>
    <tr>
      <td>IBM_VGA.ttf</td>
      <td>25.66</td>
      <td>1.99</td>
    </tr>
    <tr>
      <td>pfp.webp</td>
      <td>11.55</td>
      <td>3.69</td>
    </tr>
    <tr>
      <td>index.html</td>
      <td>6.85</td>
      <td>6.78</td>
    </tr>
  </tbody>
</table>

<p>Not too shabby. According to <a href="https://radar.cloudflare.com/scan/b672fbb4-18eb-4563-85ee-f64915dbed33/network">the new Cloudflare URL scan</a>, the size is 83 KB! Now I can finally enter the <a href="https://www.100kb.club/">100KB club</a>… Oh wait, the server is down (521).</p>

<p>Even though it has been reduced quite substantially, HALF of the size comes from the monaspace font, which I could change by a much lighter one, or even with just <code class="language-plaintext highlighter-rouge">monospace</code> but I don’t care <em>that</em> much. Plus it looks neat. Another small optimization that I did was finally converting my profile picture into an SVG that I recolored myself. It was just a 5 KB decrease but having an SVG is soo much cooler. If you’re wondering why I didn’t minify the CSS or the JS so that it would weigh even less, it’s for readability. I would like my website to be able to be reverse-engineered, and minification obstructs that.</p>

<p>As for what I’ll improve in the future, I don’t know yet. Probably speed optimizations like longer chaching TTL or pre-loading images. Maybe even going for the 100% google lighthouse. Who knows.</p>

<p>You can subscribe to <a href="http://localhost:4000/feed/blog.xml">my RRS feed</a> to get updated.</p>]]></content><author><name>Perseus</name></author><category term="meta" /><summary type="html"><![CDATA[The process of reducing the size of my website from 800 to 80 KB]]></summary></entry><entry><title type="html">A sane Nextcloud + Tailscale setup</title><link href="https://perseuslynx.dev/blog/nextcloud-tailscale" rel="alternate" type="text/html" title="A sane Nextcloud + Tailscale setup" /><published>2025-09-01T00:00:00+00:00</published><updated>2025-09-01T00:00:00+00:00</updated><id>https://perseuslynx.dev/blog/nextcloud-tailscale</id><content type="html" xml:base="https://perseuslynx.dev/blog/nextcloud-tailscale"><![CDATA[<p>A simple guide on how to set up a Nextcloud AIO docker container through a non-containerized  Tailscale instance.</p>

<!--more-->

<p>The contents below are from a discussion I started on the Nextcloud AIO GitHub Repository: <a href="https://github.com/nextcloud/all-in-one/discussions/6817">Easy setup: Container-less Tailscale as reverse proxy #6817 (github.com)</a>. If you encounter any issues during setup, please comment or refer to the discussion.</p>

<hr />

<p>Nextcloud All In One is a server solution for your files, calendars, docs and more, similar to a self-hosted Google suite. It’s used by enterprises but it can also be used by individuals who want to self host their own files. To access it however, you will need a domain, and one of the most practical and secure solutions is to use Tailscale which will not open the domain to the internet and will also act as a reverse proxy for your server.</p>

<p><strong>Motivation</strong>
This guide was created out of frustration for the lack of any general, simple, well documented guide for this setup. The most referenced one <sup id="fnref:1"><a href="#fn:1" class="footnote" rel="footnote" role="doc-noteref">1</a></sup>, formerly even in the official docs, complicates the process by containerizing Tailscale. While professional, it adds a lot of unnecessary complexity and potential errors that are avoidable for most users.</p>

<h2 id="1-configuring-tailscale-account">1. Configuring Tailscale Account</h2>

<p>You will need to have a Tailnet setup, and Tailscale installed and running on both your client and your server. For a quick intro, see: <a href="https://tailscale.com/kb/1017/install">Tailscale quickstart (tailscale.com)</a></p>

<p>Once you have your Tailscale set up both on your server and your client, you need to enable the following configs in Tailscale from the <a href="https://login.tailscale.com/admin/dns">DNS Tab (tailscale.com)</a>:</p>

<ol>
  <li>Make sure Magic DNS is enabled</li>
  <li>Enable HTTPS Certificates</li>
</ol>

<h2 id="2-installing-nextcloud-aio">2. Installing Nextcloud AIO</h2>

<p>Copy the contents from the default <a href="https://github.com/nextcloud/all-in-one/blob/main/compose.yaml">compose.yaml - Nextcloud AIO (github.com)</a>.</p>

<p>On your server, go to the directory where you will configure the Nextcloud AIO container and create a docker compose file (e.g: <code class="language-plaintext highlighter-rouge">~/docker/nextcloud/compose.yaml</code>). In there, paste the contents of the <code class="language-plaintext highlighter-rouge">compose.yaml</code> from their GitHub.</p>

<p>Inside that file, uncomment the environment section and the two properties shown below.</p>

<div class="language-yaml highlighter-rouge"><div class="highlight"><pre class="highlight"><code><span class="na">environment</span><span class="pi">:</span>
  <span class="na">APACHE_PORT</span><span class="pi">:</span> <span class="m">11000</span>
  <span class="na">APACHE_IP_BINDING</span><span class="pi">:</span> <span class="s">127.0.0.1</span>
</code></pre></div></div>

<p>In the <code class="language-plaintext highlighter-rouge">compose.yaml</code> directory, run the container with:</p>

<div class="language-plaintext highlighter-rouge"><div class="highlight"><pre class="highlight"><code>docker compose up -d
</code></pre></div></div>

<h2 id="3-nextcloud-setup-wizard">3. Nextcloud Setup Wizard</h2>

<p>On your client, which should be running Tailscale and having its DNS at <code class="language-plaintext highlighter-rouge">100.100.100.100</code> (or any other valid Tailscale IP), open your browser and paste in the Tailscale IP address of your server followed by port 8080: <code class="language-plaintext highlighter-rouge">100.123.456.78:8080</code>. You can get its IP from the <a href="https://login.tailscale.com/admin/machines">Tailscale dashboard (tailscale.com)</a></p>

<blockquote>
  <p>[!tip]</p>
  <ul>
    <li>Make sure that no other service is using port 8080 on your server</li>
    <li>If you hit any DNS related issue, try running <code class="language-plaintext highlighter-rouge">resolvectl status</code> from the client, you should see Tailscale with “Default Route” as yes.</li>
  </ul>
</blockquote>

<p>You should arrive at the Nextcloud setup page, there follow the Nextcloud instructions:</p>

<ol>
  <li>Copy the passphrase (and store it)</li>
  <li>Log in, and paste the passphrase</li>
</ol>

<blockquote>
  <p>[!tip]
If you want to use a custom Tailscale domain name, do it before submitting the domain on Nextcloud. Otherwise things will break, and you’ll be better off restarting the containers from scratch.</p>
</blockquote>

<p>It will ask you for the domain of your server, the easiest way to get it is by going to your <a href="https://login.tailscale.com/admin/machines">Tailscale Dashboard</a> and copying its full domain. Click on the IP address, and copy the one that is formatted like: <code class="language-plaintext highlighter-rouge">machine.tail0a12b3.ts.net</code>, then paste it on the domain field.</p>

<blockquote>
  <p>[!note]
The Tailscale domain is a very convenient way of having a certified HTTPS domain that only you can access. We need to use a domain since Nextcloud requires it.</p>
</blockquote>

<p>Afterwards, continue the setup wizard: select your desired containers, set up the TZ, the backup location, and finally “Download and start containers”.</p>

<h2 id="4-tailscale-serve">4. Tailscale Serve</h2>

<p>Meanwhile the containers are being set up for you by Nextcloud, go to your server and run the following command. Notice the <code class="language-plaintext highlighter-rouge">http://</code>.</p>

<div class="language-plaintext highlighter-rouge"><div class="highlight"><pre class="highlight"><code>tailscale serve --bg http://127.0.0.1:11000
</code></pre></div></div>

<p>If you’re running Systemd it is a good idea to set this as a service on startup, so create the service by pasting the following content into <code class="language-plaintext highlighter-rouge">/etc/systemd/system/tailscale-serve-nextcloud.service</code>:</p>

<div class="language-plaintext highlighter-rouge"><div class="highlight"><pre class="highlight"><code>[Unit]
Description=Serve Nextcloud backend through Tailscale
After=network.target

[Service]
ExecStart=/usr/bin/bash -c 'tailscale serve --bg http://127.0.0.1:11000'
Type=oneshot

[Install]
WantedBy=multi-user.target
</code></pre></div></div>

<p>And enable it and check that it’s running</p>

<div class="language-plaintext highlighter-rouge"><div class="highlight"><pre class="highlight"><code>systemctl enable --now tailscale-serve-nextcloud.service
tailscale serve status
</code></pre></div></div>

<p>Once that is done, try opening the domain that you configured Nextcloud to run on, and you should see yourself in the login page!</p>

<h2 id="troubleshooting">Troubleshooting</h2>

<ul>
  <li>
    <p><code class="language-plaintext highlighter-rouge">docker logs CONTAINER</code> might show some errors</p>
  </li>
  <li>If you’re having connectivity issues check:
    <ul>
      <li><code class="language-plaintext highlighter-rouge">docker ps</code> for docker exposed ports</li>
      <li><code class="language-plaintext highlighter-rouge">tailscale status</code> both on client and server (just in case)</li>
      <li><code class="language-plaintext highlighter-rouge">tailscale serve status</code> from the server</li>
      <li><code class="language-plaintext highlighter-rouge">dig DOMAIN</code> to see if the DNS resolves the domain</li>
      <li><code class="language-plaintext highlighter-rouge">curl -v ADRESS</code> from both client and server</li>
    </ul>
  </li>
  <li>If you don’t receive anything from the client in your browser but logs show no errors, and <code class="language-plaintext highlighter-rouge">curl</code> works both from the client and the server, check that your browser isn’t overwriting your DNS and uses the system default.</li>
</ul>

<div class="footnotes" role="doc-endnotes">
  <ol>
    <li id="fn:1">
      <p><a href="https://github.com/nextcloud/all-in-one/discussions/5439">Tailscale (and Caddy as a sidecar) Reverse Proxy #5439 (github.com)</a> <a href="#fnref:1" class="reversefootnote" role="doc-backlink">&#8617;</a></p>
    </li>
  </ol>
</div>]]></content><author><name>Perseus</name></author><category term="homelab" /><summary type="html"><![CDATA[A simple guide and solution on how to set up Nexcloud All In One (AIO) with container-less (system-wide) Tailscale as Reverse Proxy without using Caddy]]></summary></entry><entry><title type="html">Guide to the Internet &amp;amp; Networking</title><link href="https://perseuslynx.dev/blog/internet-guide" rel="alternate" type="text/html" title="Guide to the Internet &amp;amp; Networking" /><published>2025-08-12T00:00:00+00:00</published><updated>2025-08-12T00:00:00+00:00</updated><id>https://perseuslynx.dev/blog/internet-guide</id><content type="html" xml:base="https://perseuslynx.dev/blog/internet-guide"><![CDATA[<blockquote>
  <p>This guide goes top down, so you should be able to stop at any point and have an understanding to some degree.</p>
</blockquote>

<h2 id="big-picture">Big Picture</h2>

<p>The <em>internet</em> is a global computer <em>network</em><sup id="fnref:1"><a href="#fn:1" class="footnote" rel="footnote" role="doc-noteref">1</a></sup> made of many local networks.</p>

<p>The websites you visit are stored in a <em>server</em><sup id="fnref:2"><a href="#fn:2" class="footnote" rel="footnote" role="doc-noteref">2</a></sup> elsewhere on the planet, each time you visit them, you request their contents and the server delivers it. The <em>World Wide Web</em> (WWW), where websites are hosted is a sub-section of the internet.</p>

<h2 id="ip-protocol">IP Protocol</h2>

<p><em>IP addresses</em> identify network interfaces (devices), and they’re similar to home addresses. When visiting a domain, you must first know what is the IP address of its server. <em>Domain Name Servers</em> (DNS) tell you that. You receive the IP of your website from <em>Recursive DNS</em> which query other DNS recursively until they reach the <em>Authoritative DNS</em>, which knows the IP address of the website. This result is cached both in your device and in your router.</p>

<p>IPv4 addresses can express up to 4.29 billion IP addresses (2^32), however, IPv6 goes up to 3.4×10³⁸. IPv6 is newer and meant to tackle the limited addresses in IPv4 globally. In this guide, IPv4 will be assumed, but they are very similar.</p>

<h2 id="map-of-the-internet">Map of the Internet</h2>

<p>Your home network also uses IP addresses and they are managed through a <em>router</em>. It assigns a local IP address to each device using <em>DHCP</em>,<sup id="fnref:3"><a href="#fn:3" class="footnote" rel="footnote" role="doc-noteref">3</a></sup> but it also does <em>Network Address Translation</em> (NAT), where it relays all of them through a single public IP that has been assigned by your ISP. In the case of fiber-optic communication, all of the requests are then handled to your <em>Optical Network Terminal</em> (ONT) which converts digital signals into light.<sup id="fnref:4"><a href="#fn:4" class="footnote" rel="footnote" role="doc-noteref">4</a></sup> The <em>Internet Service Provider</em> (ISP), is the one you pay your internet bills to, and they forward your request to the <em>internet backbones</em>, which are companies that handle the fiber-optic cables under the ocean and such. From there, the process is somewhat symmetrical, until it reaches the server, where it gets processed, and returns to you not necessarily through the same path. Since the internet is a web of independent networks, each hop decides where it’s best to route the traffic.</p>

<p><img src="/src/assets/internet-guide/internet-map.svg" alt="visualization of the internet" /></p>

<h2 id="local">Local</h2>

<p>Your device and your router have a <em>Network Interface Card</em> (NIC) that gives them network capabilities, which has a unique hardware identifier called a <em>MAC address</em>.<sup id="fnref:5"><a href="#fn:5" class="footnote" rel="footnote" role="doc-noteref">5</a></sup> Inside of your <em>Local Area network</em> (LAN), aka, home network, MAC addresses are used to identify the physical devices and they are resolved through the <em>Address Resolution Protocol</em> (ARP). Once the MAC has been resolved, the IP protocol may be used to send the data. It can be sent over with radio waves (Wi-Fi) or cables (Ethernet), the latter being much faster.</p>

<p>LANs may feature multiple <em>sub-networks</em> (subnets) for different purposes to segment the traffic for convenience or security, since traffic between subnets can be easily restricted. Of the 32 bits of an IP address, a chosen amount is reserved for the subnet and the rest is to specify the devices (hosts) of each subnet. Although subnets are isolated networks, they can be managed through the same router.</p>

<p><img src="/src/assets/internet-guide/subnets.svg" alt="IP breakdown of a typical Class C home network" /></p>

<h2 id="packets">Packets</h2>

<p>All data is sent in <em>packets</em>. Like letters, they contain the message and metadata (<em>headers</em>) like destination or size. Packets are sent and received by applications through <em>sockets</em>, a logical abstraction represented as a combination of an IP address and a <em>port</em>. Each IP address may have multiple logical doors (ports) which deliver or expect a specific type of content and serve to match it to the proper application. The packet specifies in its transport header the port through which the data is being sent (source) and at which port it’s intended to arrive at (destination). For instance, when web browsing, your Operating System<sup id="fnref:6"><a href="#fn:6" class="footnote" rel="footnote" role="doc-noteref">6</a></sup> chooses an open port to send the request from, but it requests the website on port 443 of the server.</p>

<p>Packets can be encoded in many ways (protocols), between IPs usually <em>TCP</em> or <em>UDP</em> are used. TCP is very reliable as it performs multiple back and forth “connections” to ensure that the packet has arrived safely. UDP doesn’t and is therefore faster (and lighter<sup id="fnref:7"><a href="#fn:7" class="footnote" rel="footnote" role="doc-noteref">7</a></sup>), which makes it suitable for real time applications, like video-streaming or gaming.</p>

<p><img src="/src/assets/internet-guide/layers.svg" alt="Simplified headers of a packet" /></p>

<h2 id="http">HTTP</h2>

<p><em>HyperText Transfer Protocol</em> (HTTP) is the language used for requesting and serving web pages. Methods like GET and POST are used by the client<sup id="fnref:8"><a href="#fn:8" class="footnote" rel="footnote" role="doc-noteref">8</a></sup> to request or send information. A status code by the server will be sent in response, like 200 if successful, or 404 if not found.</p>

<p><em>HTTPS</em> is a more secure and widely used version of HTTP that adds additional Security by using <em>TLS</em>. This enables encrypted communication between the client and the server.</p>

<p>TLS (and its predecesor <em>SSL</em>) use certificates to both authenticate the site, and encrypt the traffic. The server sends its certificate to the client, which includes a signature from a trusted <em>Certificate Authority</em> (CA). The signature is matched with the public key from the CA pre-installed in the client. If it matches, the client knows that the IP address corresponds to the requested domain.</p>

<p>The encryption is usually done with the <em>Diffie-Hellman</em> (DH) key exchange, where public keys are shared unencrypted to independently agree on a shared key, called <em>session key</em>. Sharing a key, <em>symmetric encryption</em>, is more efficient and faster for data transfer than the <em>asymmetric encryption</em> used during the TLS handshake.</p>

<p><img src="/src/assets/internet-guide/TLS.svg" alt="Diagram of TCP + TLS 1.3 Handshake" /></p>

<h2 id="other-components">Other Components</h2>

<p><em>Firewalls</em>, used mainly for security purposes, restrict network traffic matching the packet and its headers against predefined rules.</p>

<p><em>Proxy servers</em> are a middleman that sits between you and the end server. <em>Forward Proxies</em> work for the client, managing <em>outgoing</em> client requests to the server, whereas <em>Reverse Proxies</em> work for the server, dealing with <em>incoming</em> client requests to the server. Forward proxies may be used to hide your IP and Reverse Proxies are usually used for managing the loads on each server.</p>

<p><em>VPNs</em> (Virtual Private Networks) act like a sort of forward proxy that encrypts your data when you talk to them by establishing encrypted connections between you and the VPN.</p>

<h2 id="tools-to-learn-with">Tools to Learn with</h2>

<ul>
  <li>Wireshark</li>
  <li><code class="language-plaintext highlighter-rouge">traceroute</code></li>
  <li><code class="language-plaintext highlighter-rouge">nmcli</code></li>
  <li><code class="language-plaintext highlighter-rouge">dig</code></li>
  <li><code class="language-plaintext highlighter-rouge">ifconfig</code></li>
  <li><code class="language-plaintext highlighter-rouge">arp</code></li>
</ul>

<div class="footnotes" role="doc-endnotes">
  <ol>
    <li id="fn:1">
      <p>A network is a collection of computers that can communicate with each other using the same language (protocol). <a href="#fnref:1" class="reversefootnote" role="doc-backlink">&#8617;</a></p>
    </li>
    <li id="fn:2">
      <p>A server is a (powerful) computer that performs tasks 24/7 <a href="#fnref:2" class="reversefootnote" role="doc-backlink">&#8617;</a></p>
    </li>
    <li id="fn:3">
      <p>DHCP automates assigning (leasing) IP addresses to devices. Leasing addresses allows address reuse in networks with many transitory clients.. <a href="#fnref:3" class="reversefootnote" role="doc-backlink">&#8617;</a></p>
    </li>
    <li id="fn:4">
      <p>In the case of cable, a modem is used in place of the ONT. In home networks, the ONT/modem and the router are usually inside the same physical device. <a href="#fnref:4" class="reversefootnote" role="doc-backlink">&#8617;</a></p>
    </li>
    <li id="fn:5">
      <p>They are usually permanent, but they can be changed using MAC randomization software. <a href="#fnref:5" class="reversefootnote" role="doc-backlink">&#8617;</a></p>
    </li>
    <li id="fn:6">
      <p>Operating System. E.g: Windows, MacOS, Linux <a href="#fnref:6" class="reversefootnote" role="doc-backlink">&#8617;</a></p>
    </li>
    <li id="fn:7">
      <p>Due to TCP headers having much more information to store. <a href="#fnref:7" class="reversefootnote" role="doc-backlink">&#8617;</a></p>
    </li>
    <li id="fn:8">
      <p>Client to refers to the end user in the context of client-server communication. <a href="#fnref:8" class="reversefootnote" role="doc-backlink">&#8617;</a></p>
    </li>
  </ol>
</div>]]></content><author><name>Perseus</name></author><category term="networking" /><summary type="html"><![CDATA[A 1000 word guide to the internet]]></summary></entry><entry><title type="html">Choosing a Linux distro</title><link href="https://perseuslynx.dev/blog/distro-choosing" rel="alternate" type="text/html" title="Choosing a Linux distro" /><published>2025-06-12T00:00:00+00:00</published><updated>2025-06-12T00:00:00+00:00</updated><id>https://perseuslynx.dev/blog/distro-choosing</id><content type="html" xml:base="https://perseuslynx.dev/blog/distro-choosing"><![CDATA[<p>This aims to be a practical and mostly rational guide on choosing Linux distributions.</p>

<p>There are but 2 properties that define whether a Linux distribution is suitable: Stability and Support. All the other distractions such as installation setup, package manager, default DE, etc. are negligible in comparison.</p>

<p>You can find a matrix at the end of the post.
<!--more--></p>
<h2 id="stability">Stability</h2>
<p>Stability refers to 2 things which usually, but not necessarily are correlated: Release-cycle and safety. Both are related to how system updates are released.
Release cycle refers to the frequency and the manner by which the updates are published, whereas safety refers to how likely they are to bork your system or cause trouble when applying them.</p>

<h3 id="release-cycle">Release Cycle</h3>

<p>There are 2 main types of release cycles, again with some exceptions: Rolling release and point release.</p>

<p>Rolling releases ship new updates for their libraries and packages in a non-concrete manner. On some distributions such as Arch, as soon as packages are released upstream, you can install it on your system; on others, such as Tumbleweed, there is a testing period before including them in the release.</p>

<p>Point releases on the other hand, are specific curated updates, that may take from several months, to several years to ship, but are made with the intention where all of their packages have been fully tested and don’t have any major bugs.</p>

<p>Now, there are some hybrid distributions, most notably, Fedora, where they do a bit of both. Packages can be installed in a rolling manner if you so wish to, or you can wait for the big point releases. This is achieved because they release frequent updates within the main versions of the stable-point release.</p>

<h3 id="safety">Safety</h3>

<p>Safety is not quantifiable as it depends on the previous reputation and the current ways in which it is ensured.</p>

<p>Some distributions are notorious for sometimes breaking on updates, such as Arch-based distributions. This is a consequence of the nature of the updates as they don’t get through any Quality Assurance (QA), and sometimes due to careless updates. On the opposite side there is Debian, with its 2 year point release, it ensures that 99% of the bugs are gone. Then again, that means always having outdated packages.</p>

<p>If you find that any of the extremes suit perfectly your needs, that’s great, go for them; however most people will want something in between. With point-stable releases like those found in Ubuntu-based distributions or similar you will have a pretty smooth experience but the packages will be at most 6 months old instead of 2 years. If however, you were thinking that you need the rolling release but you don’t want to sacrifice safety all that much, then consider Tumbleweed, which does some automated QA on packages before releasing them, making it safer at the cost of being 1 week behind Arch.</p>

<h2 id="support">Support</h2>

<p>The second most important thing that you should take into account is the support that a distribution has. On Linux you will have issues, or will need to search some distribution specific resources, that’s where support comes in. If you pick a distribution that has a user base of 10, and with 1 developer, good luck troubleshooting issues without modifying code. There are 2 main ways to get support which usually are proportional but not always: coders and users. Usually a larger count in any of them is positive.</p>

<h3 id="codebase-support">Codebase Support</h3>

<p>As stated previously it’s not optimal to rely on a small team for your OS. That’s why you should probably choose a distribution that is backed up by an enterprise: think Ubuntu by Canonical, Fedora by RedHat and OpenSUSE by SUSE. You know for certain that if you pick a distribution made by them, it will receive support for years to come, whereas if you pick a niche distribution that is developed by a small team, who guarantees you that they will maintain it in the foreseeable future? Unless you’re willing to switch eventually to another distribution or are willing to fix bugs yourself, I wouldn’t recommend them.</p>

<h3 id="community-support">Community Support</h3>

<p>The larger the user base, the easier it will be for you to find resources. You will have more people that are willing to help you, and more people that had the same problems as you and already solved it. This is not only for Reddit posts on r/linuxNoobs but it also means higher quality wikis, tutorials and guides.</p>

<h3 id="hardware-support">Hardware support</h3>

<p>Software needs to run on hardware, and without proper hardware support and drivers you won’t have a system to worry about if it breaks or not, because it might not even boot. To have proper hardware support you need both a large enough community so that they support your hardware components, and a large enough group of contributors to make them supported in the distribution. As a general rule of thumb, I’d say that the newer and more exotic that your device is, the more likely it is that you will need to run a faster release cycle distribution. If you’re using old, well tested hardware, like an old Thinkpad, you’re probably more than fine with Debian.</p>

<p><img src="/src/assets/linux-distro-chart.webp" alt="distro-chart" width="100%" /></p>

<h2 id="bonus-tips">Bonus tips</h2>

<ul>
  <li>
    <p>Don’t pick a distribution just because it has a certain Desktop Environment, most distributions can install most desktop environments, so don’t take it into account, ignore it.</p>
  </li>
  <li>
    <p>Package manages matter, but only to a certain degree: AUR, DNF and APT all have support for most packages, and if they don’t, you can either build them yourself, or just install them as a flatpak most of the time, it’s not the end of the world. Also, download speeds don’t really differ that much unless you’re updating Arch, every 10 seconds.</p>
  </li>
  <li>
    <p>Defaults shouldn’t matter, it’s Linux, not Windows. You can change every single configuration; if there are too many apps installed on your first boot, then uninstall them, if you’re not happy with your DE, change it; if you want a different wallpaper change it (yes, that made me avoid Fedora, don’t make the same mistake).</p>
  </li>
  <li>
    <p>Installation setup only happens once, even if you boot from the TTY, like in Arch, there are tutorials where you can copy paste what they write on screen and you’ll end up having a working system, at most it will take you 30 minutes (unless you pick something like Linux From Scratch in which case, you already know what you’re getting yourself into). So, I wouldn’t even consider it.</p>
  </li>
  <li>
    <p>Immutability is a major property that fundamentally impacts how the system works, however, it should be noted that there are very few, well enough supported options as of writing this post. If you know that you need it, go for it, however if you’re not sure my advice would be to avoid it.</p>
  </li>
  <li>
    <p>Systemd or not doesn’t really matter. Sure, your boot may be faster, but what else really, and at what cost? Systemd is the standard, and only niche distributions don’t rely on Systemd. If you choose to avoid it you’re just shooting yourself on the foot for nothing. There are more important things to consider.</p>
  </li>
</ul>]]></content><author><name>Perseus</name></author><category term="linux" /><summary type="html"><![CDATA[A practical guide to prevent distro-hopping]]></summary></entry><entry><title type="html">LineageOS review</title><link href="https://perseuslynx.dev/blog/lineageos-review" rel="alternate" type="text/html" title="LineageOS review" /><published>2025-04-18T00:00:00+00:00</published><updated>2025-04-18T00:00:00+00:00</updated><id>https://perseuslynx.dev/blog/lineageos-review</id><content type="html" xml:base="https://perseuslynx.dev/blog/lineageos-review"><![CDATA[<p>A straightforward short term review of LineageOS (22.2) experience on an old Android tablet.
<!--more--></p>

<blockquote>
  <p>Abstract: For a minimal use case, LineageOS provides everything that you need without any extra bloat. Depending on the popularity of your device, it can keep it up to date with Android updates, making it more secure. The installation can get technical, but it is well documented. The design, featuring Material You, is clean and modern, providing an aesthetic look right out of the box. It features extra customizability compared to most OEM skins. It is inherently more private than stock Android as it ships without Google Apps by default, and it has some thoughtful security settings.</p>
</blockquote>

<h2 id="background">Background</h2>
<p>My motivations behind switching to an alternate OS were for the following reasons, in order:</p>

<ol>
  <li><strong>For fun</strong>: To try out a FOSS operating system and tinker with the installation</li>
  <li><strong>Philosophy</strong>: To embrace the FOSS and minimalism philosophy</li>
  <li><strong>Security</strong>: Preventing known vulnerabilities of previous Android versions</li>
</ol>

<p>I used the device sparsely and when I did, most of the time I either read e-books or watched YouTube videos. I concede that this is a very different experience than a daily-driver phone, which you can’t afford to brick, or you want to have device integrity from the start. Keep this in mind when reading through the review, as it may not align with your prospective use case. At the <a href="#conclusion">end of this post</a> I will explore some of the other reasons why you might want to use LineageOS.</p>

<h3 id="why-lineageos-and-not-its-alternatives">Why LineageOS and not its alternatives?</h3>
<p>Because it is the most widely supported option, it covers the most devices (<a href="https://wiki.lineageos.org/devices/">Supported Devices (wiki.lineageos.org)</a>), has the most active contributors, which means frequent updates, better documentation, more polished experience and longer lifespan. Additionally, it also includes sensible defaults that balance privacy and convenience.</p>

<p><a href="https://grapheneos.org/">GrapheneOS</a> and <a href="https://calyxos.org/">CalyxOS</a> are some popular alternatives. I would only recommend them if you have one of their limited range of supported devices and value privacy as the outmost important parameter.</p>

<p>As for <a href="https://e.foundation/e-os/">/e/OS</a> it is just a LineageOS fork with micro-G out of the box. De-googling is it’s main selling point, however that is also present in the LineageOS system. It is also less customizable and doesn’t feel as modern.</p>

<h2 id="installation">Installation</h2>
<p>The installation process was adequately documented with some room for improvement for certain tasks, regardless, with a bit of intuition you should be able to get a proper installation with no problems. Make sure to read <em>everything</em> in the instructions. For me, the installation wasn’t troublesome and it took around 30 minutes, but depending on your technical expertise or your device, your mileage may vary.</p>

<h2 id="setup">Setup</h2>
<p>It was more straightforward than the regular Android experience, as it featured less steps, including those that push you unwanted apps or additional (anti-)privacy agreements. From the get-go you notice the clear inspiration of the Material design which provides a very clean and modern look.</p>

<p>It shipped with just 12 essential apps to get you started. If you want to download more apps you can. I didn’t add the Google Apps/Services add-on so it didn’t include an app store, however from its default browser you can install your favorite FOSS app repository APK such as <a href="https://f-droid.org/">F-Droid</a>, <a href="https://droidify.eu.org/">Droid-ify</a> or <a href="https://auroraoss.com/aurora-store">Aurora Store</a> to download all your other apps.</p>

<h2 id="usage">Usage</h2>
<p><img src="/src/assets/lineageos-homescreen.webp" alt="Home Screen" width="100%" /></p>

<p>The Android 15 experience felt fresh after being stuck at the eleventh version. The UI feels snappy and responsive, although it was previously adequate. Being able to customize it further than stock options was also a plus.</p>

<p>It provides extra privacy options and one of the features that I appreciated the most was the ability to turn off the camera or microphone system-wide from the status bar menu. Even though I did not try it yet, it also supports relatively easy rooting with Magisk which let’s you take control of the device to the next level.</p>

<p>Regarding the battery life and performance, it felt similar. Unfortunately, I don’t have any concrete evidence or benchmarks to demonstrate any change.</p>

<p>Surprisingly, the OS just… works. No bugs occurred and apps worked fine. If I used the device more often and with more apps, I would probably notice some errors. Regardless, I will update this section if any issues arise.</p>

<h2 id="conclusion">Conclusion</h2>
<p>In conclusion LineageOS is a straight-forward, privacy-respecting, extended-support mobile operating system. It offers support for the widest range of devices out of its alternatives, and it takes privacy into account. I would recommend it if you wanted to…</p>

<ul>
  <li>…update an old device</li>
  <li>…enjoy a google-free experience</li>
  <li>…care about privacy</li>
  <li>…have greater control of your phone</li>
  <li>…embrace FOSS philosophy</li>
  <li>…install a new OS</li>
</ul>

<p>LineageOS isn’t revolutionary, but it provides a cleaner, leaner and more private experience.</p>]]></content><author><name>Perseus</name></author><category term="software-review" /><summary type="html"><![CDATA[A straightforward review of LineageOS]]></summary></entry><entry><title type="html">The Colemak Experience</title><link href="https://perseuslynx.dev/blog/colemak-experience" rel="alternate" type="text/html" title="The Colemak Experience" /><published>2024-12-28T00:00:00+00:00</published><updated>2024-12-28T00:00:00+00:00</updated><id>https://perseuslynx.dev/blog/colemak-experience</id><content type="html" xml:base="https://perseuslynx.dev/blog/colemak-experience"><![CDATA[<p>Since around 26th of August 2023, I have been typing with the keys of my laptop jumbled around. What is it like typing with a non-qwerty layout? Are there any benefits? But most importantly: Is it worth it?</p>

<!--more-->

<blockquote>
  <p><strong><em>Abstract:</em></strong> Typing a non-qwerty layout feels more comfortable and satisfying to type. The learning curve is steep for the first days but with enough practice, the awkwardness can be reduced completely in a week or so. Anecdotally, I did experience greater typing speed improvement compared to qwerty. Therefore, I would consider that switching permanently to an alternate keyboard layout is worth it, although I would choose a modern, well-optimized keyboard.</p>
</blockquote>

<h2 id="the-revelation">The revelation</h2>

<p>I don’t quite remember what was the thing that sparked my interest in alternative keyboard layouts, but it probably was a YouTube video. According to my YouTube history, the oldest mention to an alternate keyboard layout was <a href="https://www.youtube.com/watch?v=a2Nb9QVujgU">“how I went from 10 to 130WPM in 3 months”</a> by Pinguefy.</p>

<p>I had heard that there were variations of the standard layout, like the French AZERTY, but never had given them a second thought, and thought that they were unnecessary. QWERTY worked fine. Right?</p>

<p>Well, after watching that video and a barrage of others during the following weeks, I started to realize that QWERTY wasn’t so great.</p>

<h2 id="the-fragility-of-rigidity">The Fragility of Rigidity</h2>

<p>No one really knows exactly why QWERTY has the letters arranged like it does. Similarly, no one really knows why the Latin alphabet is ordered in the way that it is. Some say it placed the common letters far apart so that the typewriters wouldn’t get jammed, whilst others say that it came from the morse code machines. Truth is that it had a lot of iterations before it came to the current design, and if you are interested about them, you can check them out here: <a href="https://en.wikipedia.org/wiki/QWERTY#History">QWERTY [wikipedia.org]</a>.</p>

<p>Ever since the final version was reached and popularized in 1878, the design hasn’t changed much, as people have grown accustomed to it and refuse to replace it with anything else. However, this is one of the many cases where the most popular option isn’t necessarily the best one. Even though some optimizations were made since the first alphabetical iteration, the keyboard still has many glaring issues. One of the best ways to see them is with a heatmap:</p>

<p><img src="/src/assets/qwerty-heatmap.webp" alt="qwerty-heatmap" width="100%" /></p>

<p>
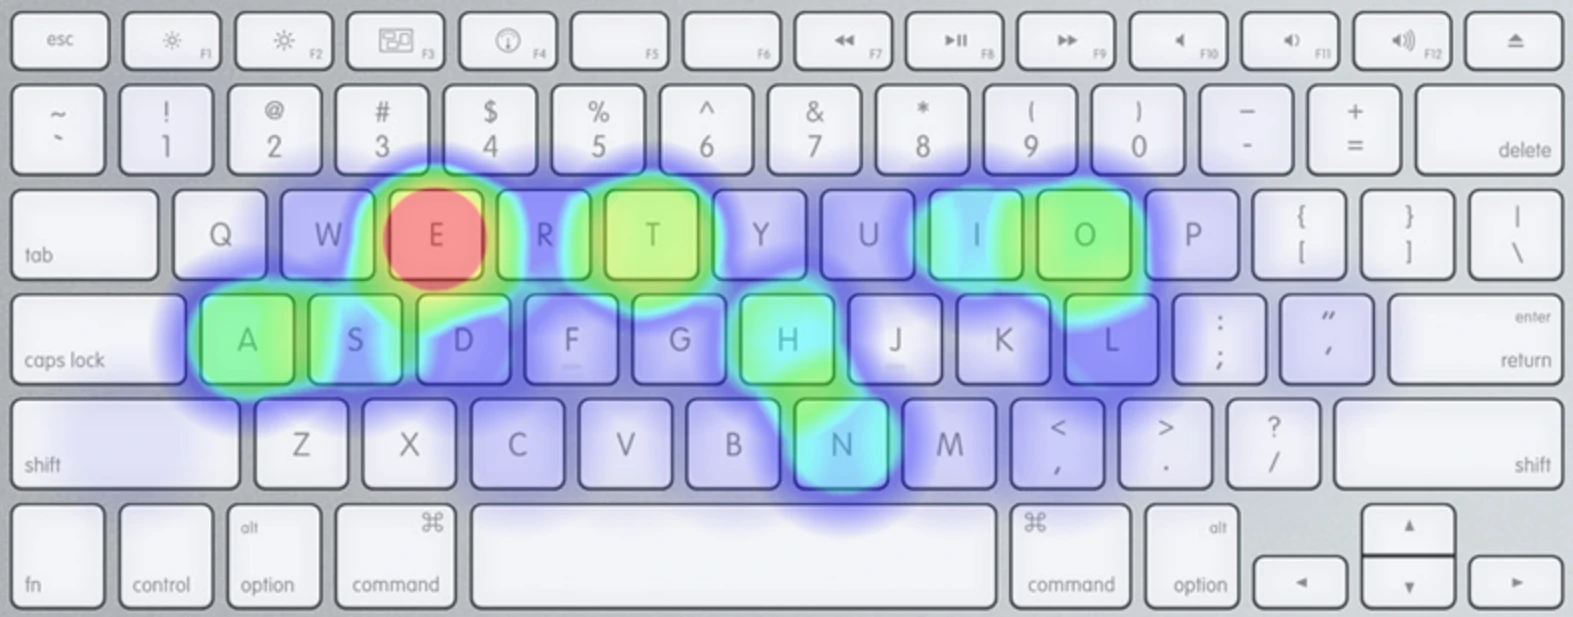
I don’t know about you, but that doesn’t scream “optimized” to me. The letters with the highest frequency don’t appear to be assembled in any thoughtful order, how is this the global standard? If a thoughtful design were to be made, it would probably put the most used keys in the home row, to reduce the travel distances for the fingers.</p>

<p>But the heatmap just tells us that we might have to move our fingers further than we should, but the issues don’t end there. Let’s look into the most common same-finger bigrams (SFB) in qwerty, aka. the most common two-letter combinations that must be typed with the same finger. This, combined with the heatmap, can give us a good idea of the comfort of a keyboard layout. According to the <a href="https://cyanophage.github.io/#qwerty">Keyboard Layout Stats [cyanophage.github.io]</a>, qwerty has 4.39% SFB, with the most common being the <code class="language-plaintext highlighter-rouge">ed</code>, <code class="language-plaintext highlighter-rouge">ec</code> and <code class="language-plaintext highlighter-rouge">lo</code> combinations. That might seem like a low figure but later we’ll see what has been achieved with modern layouts.</p>

<h2 id="my-choice">My choice</h2>

<p>I have got to admit that my research wasn’t as thorough as it should have been, as in the end I only ended up considering 3 keyboard layouts:</p>

<ul>
  <li>Workman</li>
  <li>Dvorak</li>
  <li>Colemak</li>
</ul>

<p>Even though there were many more options out there, I was oblivious to them or considered them too experimental. After reading the <a href="https://workmanlayout.org/">Workman Layout Philosophy [workmanlayout.org]</a>, written in 2010, I was convinced, that this was better than the alternatives. It even said that Colemak was bad, and I was already pretty convinced that Dvorak was not optimal either. So, I went for workman. Using the <a href="https://www.microsoft.com/en-us/download/details.aspx?id=102134">Microsoft Keyboard Layout Creator (MSKLC) [microsoft.com]</a>, I put workman and started practicing.</p>

<p>The typing felt really nice with its smooth rolls, although it was also painfully slow due to my inexperience with the layout. I had been so invested into alternate keyboard layouts during the past week or so that I still searched for other resources, hoping that they would support my choice of going for the Workman layout, however, the more I looked the more I realized that this was far from perfection. That’s when I discovered the Colemak Mod-DH layout.</p>

<h2 id="my-final-choice">My (final) choice</h2>

<p>The issues that were discussed in the Workman layout website from 2010 had already been solved in 2014 by Colemak-DH. A mod that specifically catered the concerns that OJ Bucao, the creator of the Workman layout, and many others had raised. It seemed like it was the modern Dvorak, and the more I investigated, the more I became convinced that this was the best choice. I even did some layout comparisons using SteveP’s fork of the <a href="https://stevep99.github.io/keyboard-layout-analyzer/#/main">Layout Analyzer [stevep99.github.io]</a>, and the <a href="https://colemakmods.github.io/mod-dh/analyze.html">Analyze Layouts [colemakmods.github.io]</a> tool. In both tests Colemak-DH came on top.</p>

<p>Now, looking in retrospect, what did I expect? I used the tests from SteveP, the creator of the Colemak-DH mod, and from the colemakmods github. Even though the results were probably realistic, they could have easily been biased.</p>

<p>Either way, back then I didn’t realize and went for it. Although when placing the keys in MSKLC, I noticed that the <code class="language-plaintext highlighter-rouge">v</code> and <code class="language-plaintext highlighter-rouge">d</code> should be swapped. The original design was meant for orthogonal split keyboards, but I had an ISO keyboard. This meant that, I typed the <code class="language-plaintext highlighter-rouge">d</code> key, which is the <code class="language-plaintext highlighter-rouge">c</code> in the qwerty layout, with the middle finger, and the <code class="language-plaintext highlighter-rouge">v</code> key, which is the <code class="language-plaintext highlighter-rouge">v</code> key in qwerty with the index finger. <code class="language-plaintext highlighter-rouge">d</code> is far more common than <code class="language-plaintext highlighter-rouge">v</code>, in fact up to 4 times more common (<a href="https://en.wikipedia.org/wiki/Letter_frequency">Letter Frequency [wikipedia.org]</a>).  That’s why I decided to swap them, and thus became the current layout that I still use to this day.</p>

<h2 id="the-initial-experience">The initial experience</h2>

<p>You need to keep in mind that I started this journey more than a year ago, and even though I documented some of it in some sparse notes, I don’t remember that much about it.</p>

<p>I started learning the layout through <a href="https://www.colemak.academy/">Colemak Academy [colemak.academy]</a>, but I only used that until I knew more or less where the keys were, which took me around an afternoon to figure it out. The good thing about this website is that it has different levels in which you can learn the keys from groups at a time, which makes the transition much smoother. After, I felt confident enough with all keys, that I wouldn’t confuse them for the qwerty alternatives, I decided to jump to <a href="https://monkeytype.com/">MonkeyType [monkeytype.com]</a>. There, I created a tag for my Colemak-dh journey, as I didn’t want to reduce my comparatively fast speeds with qwerty.</p>

<p>I started training on 10 word tests, then 15 seconds, 30 seconds, and finally 60 seconds. I also did some <a href="https://play.typeracer.com/">TypeRacer [typeracer.com]</a> quotes.</p>

<p>During the first 2 weeks I tryharded a lot, doing between 12-50 minutes of typing daily. In the end, after 50 days exactly and 18 hours of typing, I reached  100 WPM in the 60 second test.</p>

<p>I still have a screenshot of my initial typing progression of the first days, before I reached the 100 wpm milestone.</p>

<p><img src="/src/assets/colemak-monkeytype-progression.webp" alt="Colemak MonkeyType Progression" width="100%" /></p>

<p>However, not everything was fun and roses. At the time I had to do an assignment and used to my moderately fast speeds of 120 wpm, the 40 wpm that I had felt painfully slow. This is why I had to resort to Speech To Text from Word to write the bulk of my work.</p>

<p>Not only that, but some programs do not recognize the layout from MSKLC and so I had to use the previous qwerty keys for some programs, and the Colemak keys for others. This issue still bothers me to this day.</p>

<h2 id="the-current-experience">The current experience</h2>

<p>My current experience is very satisfactory.</p>

<p>I have also been practicing typing on and off since I’ve started, and I have now surpassed my previous qwerty speeds that I took years to reach. Now, after 1.4 years, I can type at 120 wpm comfortably for 60 seconds, and peak at 140 in MonkeyType. As for quotes, I can comfortably reach 100 wpm, and peak at 120 wpm.</p>

<p>Compared to my 120 wpm peak in MonkeyType and 80 wpm in quotes, it is an improvement.</p>

<p>Regardless, speed is not what matters for the alternate keyboards, but comfort. I actually enjoy typing and feel comfortable doing so, much more than when I used qwerty.</p>

<p>However, I can still type in qwerty, since the previous muscle memory hasn’t erased completely. Sure, I need to look at the keyboard every now and then, but I still can type at ~80 wpm, which feels slow but tolerable.</p>

<h2 id="was-the-change-worth-it">Was the change worth it?</h2>

<p>I’d say it was 95% worth it.</p>

<p>It was great in all aspects, but I didn’t REALLY need to do it. I still have some issues with some programs that I’m sure can be solved with some flashing software like qmk/via, but I can’t bother. I also need to have qwerty as an alternate layout in case anyone wants to use my keyboard without typing jumbled letters, but this problem doesn’t arise very often.</p>

<p>However, there are a couple of things that I would have done differently but I don’t plan on doing because I just don’t see that they would bring that much of a benefit in relation to the effort needed to implement them.</p>

<h2 id="what-would-i-have-done-differently-now">What would I have done differently now?</h2>

<h3 id="i-would-have-chosen-a-different-layout">I would have chosen a different layout</h3>

<p>Even in 2023 there were a lot of modern layouts that boasted improved stats over Colemak-dh. The difference may be hardly noticeable, but as a fan of ultra-optimization I probably would have gotten for them now. Since then, I have discovered that there are other more comprehensive layout evaluation tools, one of my favorite being: <a href="https://cyanophage.github.io/#qwerty">Keyboard Layout Stats [cyanophage.github.io]</a>. It includes probably almost all modern layouts, and it compares them more exhaustively than I’ve seen any other website do. For example, there you can see that modern layouts can achieve SFBs as low as 0.36%, which is ridiculously low compared to the 0.91% of colemak-dh and 4.39% of qwerty. Or achieve travel distances half of those with the qwerty layout. Truly impressive.</p>

<h3 id="i-would-have-practiced-qwerty-more-often">I would have practiced qwerty more often</h3>

<p>It really doesn’t take that much effort to maintain a not-so-fast typing speed, and I would consider it worth it, especially when using other keyboards / computers that don’t have your layout.</p>

<h2 id="conclusion">Conclusion</h2>

<p><a href="#">See abstract</a></p>

<h2 id="further-reading">Further reading</h2>

<ul>
  <li><a href="https://cyanophage.github.io/#qwerty">Keyboard Layout Stats [cyanophage.github.io]</a>.</li>
  <li><a href="https://colemakmods.github.io/mod-dh/analyze.html">Analyze Layouts [colemakmods.github.io]</a></li>
  <li><a href="https://stevep99.github.io/keyboard-layout-analyzer/#/main">Layout Analyzer [stevep99.github.io]</a></li>
  <li><a href="https://github.com/bclnr/kb-layout-evaluation">Keyboard Layout Evaluation (outdated) [github.com]</a></li>
  <li><a href="https://getreuer.info/posts/keyboards/alt-layouts/index.html#which-alt-keyboard-layout-should-i-learn">A guide to alt keyboard layouts [getreuer.info]</a></li>
  <li><a href="https://mk.bcgsc.ca/carpalx/">Carpalx [mk.bcgsc.ca]</a></li>
</ul>]]></content><author><name>Perseus</name></author><category term="keyboards" /><summary type="html"><![CDATA[assesing keyboard layouts]]></summary></entry></feed>